Friday, February 10, 2017

Scrappy Project Planner {and 3 Scrappy Pouches}!


Who doesn't love a good scrappy project?  Lori Holt has created this beautiful new planner to keep your quilting-life organized AND includes 6 scrap-happy quilt patterns!  Fat Quarter Shop even made this awesome video to show you the entire planner!!!  Ummmm, did I mention it comes with accessories?!?!?

 I'm going to show you what I did with Lori's Shortcut Star Quilt pattern--and it wasn't make a quilt! :) 

Pouches!!!!

One of the things I love about Lori's designs is that they work so well with my own fabric preferences!  While I adore Lori's sweet style, I prefer something a bit bolder and brighter!  For my blocks, I chose some (now hard to find) Tula Pink from her Salt Water and Prince Charming lines.  Often I have small bits of precious fabric left over from a larger quilt and I just can't get rid of them!  This is where these scrappy quilt/project ideas come in so handy!  I got to use some of my favorite fabrics in an item that can be seen daily! 

You don't always have to make a quilt with quilt blocks!  Hot pads, coasters, mini quilts, and zippered pouches are all quick, satisfying projects that only require a block!  

These blocks finished at 10" and made the perfect project bag to carry my EPP hexagons, cross stitch, or needlepoint works in progress!

And did I mention the back of the pouches where I used a fun-tastic seagull/ocean/whale tail print????  When you add in those tiny tassels I found on Etsy: cuteness overload!!!!

Don't forget to check the other stops on the Scrappy Project Planner Sew-a-long!

February 3rd

February 10th

February 17th

February 24th

March 3

March 10


Thursday, January 12, 2017

I Have a New Pattern....and My Own Show!!!!


Sooooooo, in case you haven't heard, I have my own show! A webseries on QNNtv!  It's a FREE show, you just have to sign up for a FREE QNN account.  (You can click the link on the upper left part of my blog to go to the site.)  The concept of the show is pretty simple: I use a more traditional/vintage pattern featured in an upcoming magazine issue and remix it to make it my own, slightly more modern version!  That's not all, we also have a guest every episode showign their remix so you'll get even more inspiration!!! 

The first episode has already been released and a new segment will follow every week!  First up is my pattern, Following!  Don't you just love a rainbow?!?!?!?  You can find the pattern in my Etsy or Craftsy shop!!!  Squeee!!!  I'm so excited for all the cool quilts to come!  There will be a new one every month ALL YEAR so stay tuned!!!!

Tuesday, December 13, 2016

Curious Dream Blog Hop {and Giveaway!}


I'm going to do my best not to make this post too sappy, so forgive me in advance if I fail.  I found out around a year ago that my friend Angela was designing a fabric line.  I was secretly thrilled I was one of the few people who got to peek in on her process:  agonizing on which prints were best, indecision on exactly what shade of blue was just the right one,  etc.  I was {almost} as excited as she was when Windham Fabrics picked up her line, Curious Dream!  I mean, come on! This is the same fabric company that has artists like Heather Ross and Lotta Jansdotter!  It is unbelievably rewarding to witness a friend's dream come true.  I am so proud of her and all the hard work that went into this collection, inspired by Alice in Wonderland.  I HIGHLY recommend browsing her stunning look book for this collection.  It is jaw dropping! 

So what happens when one of your good friends designs a fabric collection?  You get mail like this!!!!  Then you realize you actually have to open the bundle and cut the pretty, pretty fabric......  drat!  I'm not going to lie, the timeline for the blog hop wasn't great for me.  I had my own deadline for 9 (yes, NINE) quilts to complete, but I was not going to miss out on a chance to create something with this beautiful collection and SHOUT about how stinkin' happy I am for Angela!!!  She always teases me about how fast I am so I needed to live up to the hype!  I created 3 different projects with Curious Dream!

First up is a simple patchwork pouch.  I love making little pouches like this!  You don't need much fabric and it's a fun way to showcase the entire collection, especially that little rabbit who is a personal favorite of mine.

Hi sweet rabbit!!!


Next is a Jane Market bag.  This is a classic grocery tote shape and always a huge hit as a gift around the holidays. 

I am OBSESSED with the Alice patchwork print!  Hello bags and backing!!!  

I used it here as the middle accent pocket and used another Windham collection, Twilight, for the navy print in the body of the bag. 

For the lining I used two of the lock/heart lock prints.

For the straps I used one of the "key" prints.  Love the lock and key theme!!!

 Last up is a mini quilt.  I thought what could be more "Alice" than a wonky 9 patch! 

 This being the real world, I will admit I messed up my 9 patch shuffle in my excitement to finish, but I love the results all the same!


Now, for the fun part!!! I'm giving away a FAT QUARTER BUNDLE of Curious Dream!!!!  All you have to do is leave a comment.  Maybe tell Angela how awesome her fabric is.  Just a suggestion! :)  If you want to enter another giveaway, hop on over to my IG account @kelbysews to enter for a chance to win one of the items I made with Curious Dream! 


Thank so much for joining me on the blog hop!  Be sure to catch all the stops for more fun Curious Dream projects and more giveaways!  

Curious Dream Blog Hop Stops 
Monday, December 12th – Windham Fabrics: https://windhamfabrics.wordpress.com/
Tuesday , December 13th – Kelly Bowser –Kelly Sews  http://www.kelbysews.com/
Wednesday, December 14th – Brooke Sellmann- Silly Mama Quilts http://www.sillymamaquilts.com/
Thursday, December 15th - Wendy Sheppard -Ivory Spring  https://ivoryspring.wordpress.com/
Friday, December 16th – Becca Bryan – Bryan House Quilts  http://bryanhousequilts.com/
Saturday, December 17th –  Chris Dodsley- Made by ChrissieD  http://madebychrissied.blogspot.com/
Sunday December 18th – Aurifil - https://auribuzz.wordpress.com/
Monday, December 19th-  Jennie-  Clover & Violet http://www.cloverandviolet.com/
Tuesday, December 20th – Stephanie Kendron – Modern Sewciety  http://www.modernsewciety.com/
Wednesday, December 21st – Joanne from  The Fat Quarter Gypsy – http://www.thefatquartergypsy.com
Monday, December 22nd – Heidi Staples – Fabric Mutt  http://fabricmutt.blogspot.com/
Friday, December 23rd – Round up post at Windham Fabrics https://windhamfabrics.wordpress.com

Winners announced Friday, December 23rd!


LinkConnector Validation

Tuesday, October 18, 2016

Pillowcases {Plus Matching Pouch} Tutorial: How I Used My Stash Builder's Box


I'm a bit of a subscription box addict.  There!  I admitted it!  This is the first time I've tried the Stash Builder's Box and part of the reason I was drawn to it was because it includes 3 YARDS of fabric (3 one yard cuts).  So I decided to challenge myself to see what types of projects I can make using these three coordinating yards!

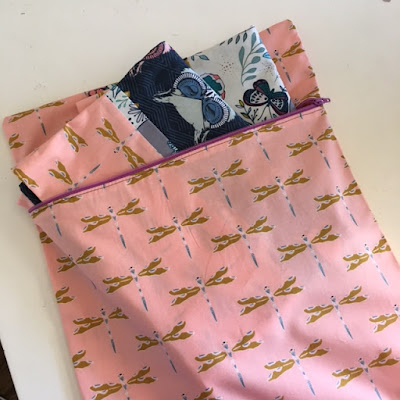
I received these three beautiful prints from Maureen Cracknell's Nightfall Parade collection.  Please note, not everyone receives the same prints, but they're all from the same collection.  Since I got some larger scale prints, I decided I needed a project to showcase Maureen's beautiful artwork!  Hello!  Pillowcases!  I realized I would have some fabric left so I also designed a matching zippered pouch to put the pillowcases inside--instant gift!!!!  Reality check: there are plenty of tutorials out there for pillowcases, so my method is my no means new.  Also, I do not prewash my fabric.  Pillowcases are very forgiving.  I've made over 50 and have never had an issue washing and drying them.  


Cutting instructions for pillowcases:

From Print 1 & Print 2 (main body of pillowcases and accent pieces) cut:
(1) 1.5"xWOF
(1) 27"x WOF

From Print 3 (cuffs)
(2) 9"xWOF

Trim selvedges off so each strip is 40"-42" wide.  The main idea is to get all the WOF pieces the same width, but without selvedges.  This width can vary slightly depending on the width of the fabric you are starting with.  I was able to trim off all the selvedges and each strip of fabric be 42" wide.  

Fold and press the 1.5"x42" (ish) strips in half longwise.  You should end up with two 3/4" x 42" strips.

Lay each 9" cuff strip down, face up.  Place the 3/4" accent piece on top, matching the raw edges. 


Next, lay the main body of the pillowcase RIGHT SIDE DOWN on top of the cuff and accent piece.  Pin.  For my pillowcases, I used opposite fabrics for the accent pieces and the main body.  Meaning, if the main body of the pillowcase was the owls, then the 3/4" accent strip was the bunny print.  


Gently roll/fold up the main body fabric until you can see the other side of the cuff.


Pull up the bottom of the cuff and pin to the existing layers.   The RIGHT side of the cuff should be touching the WRONG side of the main body of the pillowcase.  You should have one long tube with FOUR raw edges pinned on one side.


This is what they should look like before the next step.  You should only be able to see the WRONG side of the cuff fabric.  Everything else should be inside the tube.  

Sew down the length you have pinned using a 1/4" seam allowance.


Like this.  You don't have to be perfect.  Promise!


Pull out the fabric inside the tube.


It should look something like this.  It could probably use a little pressing at this point.  


See?  Cuff, accent, main body.  The raw edges are encased in the tube of the cuff.

See?  Two almost pillow cases!  Now we need to sew the side and bottom seams!  


Place the WRONG sides together, match up the side and bottom seams.  Pin. 


It should look like this before you sew!


Sew the one open side and bottom of the pillowcase using a 1/4" seam allowance.  Do NOT sew the top (cuff fabric side) closed!!! You need it open to actually put a pillow inside! :)  

Turn the pillowcase wrong side out.  Now the RIGHT sides should be facing.  Press to establish a nice side and bottom seams.  We are about to create a French seam and enclose those raw edges!


Using a 1/2" seam allowance, sew along the side and bottom, enclosing the raw edges (French seam).


Turn pillowcases right side out, trim any extra threads hanging out,  and you're done!


Now, to create a cute zippered pouch to gift your pillowcases!  All you will need is a 14" nylon zipper plus the remainder of Print 3.  Please don't use a metal zipper with this project!!!

From Print 3 cut:
(1) 14"x16.5" 
(1) 14"x5" 
(1) 14"x12"

Place zipper right side down on top of the right side of the 14"x12" piece.  You will be sewing it along the 14" top. 

Press fabric away from the zipper teeth and top stitch 1/8" from the edge.

Now we need to attach the top part of the pouch to the zipper.


Place the 14"x5" piece right side down on top of the right side of the zipper.


Press the 5" piece away from the zipper and repeat the top stitching process. 


Place the zippered front unit on top of the 14"x16.5" back piece.  WRONG SIDES together.


Pin around all sides, matching raw edges.  If for some reason your zippered top piece is smaller than the back piece, just trim the back piece to match.  Open zipper half way before you sew! 

Sew around all four sides with a 1/4" seam allowance.  

Turn the pouch wrong side out and press.  Then repeat the French seam process we learned earlier by sewing all around the pouch using a 1/2" seam allowance!   

Turn pouch right side out through the open zipper.  

You're done!!!!  This is such a fast project it can easily be done in an afternoon!  It's perfect for birthday, teacher, or hostess gifts because you're creating your own wrapping and don't have to go foraging through the attic to find your solitary roll of non-Christmas paper.  Please tell me I'm not the only one who has to do that!!!  Please tag me on IG if you make this project @kelbysews and I'm sure @stashbuildersbox #iheartsbb would love to see too!


Related Posts Plugin for WordPress, Blogger...